Pages

Tuesday, March 18, 2014

Delicious and Easy Peasy Homemade Peanut Butter!!!

Yes, I know, its been quite a while since I've said hello on here. The reason? My last semester of classes as an undergrad! My last semester at Brigham Young University Idaho began in January and man is it a beast! Its taking up all of my time, so even though I've been experimenting with yummy recipes, I've had no time to post them! Back in December I meant to write a post about the cute gingerbread houses my hubby and I made (completely from scratch!). But I just got busy and haven't found time to post until now. But gingerbread houses will have to wait till another time. Today is for peanut butter.

Last month, McKay and I realized that we still had over $100 on gift cards to Bed, Bath, and Beyond from our wedding. We got excited and started looking at what we wanted to get with the money. We settled on a pretty nice food processor. We had been wanting to try our hand at homemade hummus and I had seen some nut butter recipes I wanted to try. So we made the purchase and waited for our lovely Cuisine Art food processor to arrive. I was so excited, and it came so quickly! We made hummus that night, but are still experimenting with the recipe, so that will also come later. Our next experiment with the food processor was peanut butter.

Peanut butter is probably the easiest thing to make! All you do is put 16 oz of peanuts into the food processor and turn it on. Thats it. Really.

You might not believe me, because at first it looks like this and you wonder how it will ever become smooth creamy yumminess. But just be patient...


It takes between 5-10 minutes, but it will slowly become peanut butter....


As the food processor does its thing and the peanuts get more chopped up, they release oils that will moisten it all up and the peanut dust will start to become a ball of peanut dust all stuck together...


And after just a little longer it looks like this:


Yum!

If you like chunky peanut butter you can toss a handful of peanuts in at this point and pulse the processor a few times to get the chunks. I like my peanut butter nice and smooth though, so this is how it stayed. When you first finish it, its fairly warm from the spinning blade. This means that you can practically pour it into whatever airtight container you plan to store it in. I'd recommend storing it in the refrigerator since there are no preservatives in it, but it should last a good month (if not longer!). 


The first time we made our own peanut butter we also threw in about a 1/2 cup of chocolate chips into the food processor. The heat and the blade melted/chopped those up and we got a nice chocolatey-peanuty butter that was delish to just eat on a spoon. That's pretty much how we ate the whole jar :)

Any who, try it, its delicious and so easy. Plus its pure peanuts! How cool is that? Have fun!

Sunday, December 8, 2013

Crock-potted Pork Roast

Okay, this isn't any special recipe. Its super easy and probably 99% of the time comes out deliciously. But I wanted to blog about this because of a weird thing that I found on my roast. I bought the roast a few weeks ago on an awesome sale at Broulims. Its a 6 or 7 pound pork should roast and I bought it for $4. Pretty dang good, right? So this morning when I went to prepare it for the crockpot I put on the cutting board and noticed a rough feeling layer on top. I thought it was that little absorbent mat thing that other meat packaging has. However, when I tried to remove it, I just couldn't. I realized then, that it was the pig's skin! The actual skin! Pig skin still on my roast! Euww! It was the weirdest thing. I didn't know they leave the skin on some roasts! My roast was a pork shoulder picnic roast, and when I looked it up later it seemed that leaving the skin on these roasts was normal....weird but ok....


Anyway, on to the recipe. Its really simple. Put the roast into the crockpot, add carrots (baby or chopped), chop up a few potatoes and add those too. My mom often adds chopped onions as well, but I didn't have any on hand. I sprinkled the top with garlic salt and voila!

Its ready to sit in that crockpot for 8-10 hours on low or 6-8 on high. Yum!

When I was looking up the weird skin, I came across this recipe for pulled pork using a pork shoulder roast. It looks so yummy! I think I'll try it in the near future....

Wednesday, November 20, 2013

Baked Potato Soup

So, a few Christmas's ago my grandma gave my sisters and me a cookbook full of her "tried and true" recipes. In it she included little notes about where she got the recipe, a time she made the recipe, or something about how to make the recipe. It is on of my most cherished gifts. I absolutely love it and love making recipes from my grandma. Thanks Grandma!

Its been getting cold here in Rexburg and actually snowed a good amount. While I'm not so pleased with the snow, it makes for great soup weather. I love soup! And I am loving learning how to make a lot of different kinds of soup. This baked potato soup recipe comes from my grandma's cookbook and let me just say that everything in the cookbook is delicious, so get ready:

Baked Potato Soup

2/3 cup flour
2/3 cup butter
3/4 tsp salt and pepper
6 cups of milk
1 tbs chicken bouillon 
4 medium sized baked potatoes
12 slices cooked and crumbled bacon
4 green onions chopped up
1 1/4 cup grated cheddar cheese
1 cup sour cream

You start by making a roux--melt the butter over low heat. Once it is completely melted, and the flour and whisk till smooth. Cook for 1-2 minutes stirring constantly (it burns easily). Then gradually whisk in the milk and raise heat to medium.

The mixture will slowly get thicker and bubbly. I added about 1-2 cups of chicken stock to thin it out a little because it got really thick. 

Once its all thick and delicious add all of the rest of the ingredient, except for the sour cream. Don't add the sour cream until just before you serve the soup. Make sure everything is mixed in and hot. 


Once you're ready to serve this yumminess, turn off the heat and mix in the sour cream. I didn't mix it all the way in, because it was really yummy eating it just swirled in....if that makes sense...yah.

McKay told me that when he mom used to make this soup they would eat it topped with a dollop of sour cream and a sprinkle of cheese. Sounds delish!

Anyway, this is a super yummy soup and really easy too. Make it and stay warm :)

Thursday, November 14, 2013

Spinach Mozzarella Grilled Cheese

Hubby and I decided we wanted to start getting Bountiful Baskets every once in a while. For those of you who don't know what these wonderful things are, go here. Basically, you get a huge box full of fresh fruits and veggies for $15! Amazing right? We got our first box this past Saturday and were amazed at how many yummies we got. Included in the box was a big bunch of spinach. Now, I've never really been the kind of person who loves spinach. I'll eat it in an occasional salad, and it can be yummy as a topping on some pizzas. But other than that, I don't eat it very often. So I've been trying to figure out what to put our spinach in. I found this delicious sounding recipe for these grilled cheese sandwiches, and we just so happened to have mozzarella! It was perfect. Here's the recipe:

Spinach Mozzarella Grilled Cheese

1 1/2 Tbs olive oil
1/2 onion (chopped real small)
1 clove of garlic minced
8 oz of fresh spinach
4-8 slices Bread
Butter
1 cup mozzarella cheese (or more!)

So you all know the deal with grilled cheese. Spread butter on one side of all the slices of bread. I made this recipe into 2 really full sandwiches. But I think its supposed to be made into 4.

Heat the olive oil in a pan on medium heat. Add the onions and garlic and saute until onions are soft and almost caramelized. Then add the spinach and a small amount of water (1/4 cup maybe). Let cook until the spinach is wilted, stirring constantly so it doesn't burn. Set aside mixture.

Now, set one slice of bread (butter side down) into the pan and add a nice layer of mozzarella cheese. Spread some spinach mixture on top and add another layer of cheese. (Go ahead and add some salt and pepper to taste). Top with the 2nd slice of bread (butter side up). Cook on a low temperature so that the cheese has time to get all melty and tasty.

Voila! Now you've got one tasty grilled cheese! McKay and I thought these would be so yummy with tomato soup. I found a really delicious recipe that I'll post later. Enjoy!!!

Monday, November 4, 2013

Pumpkin Seeds with Brown Butter and Sage

McKay and I carved a pumpkin for Halloween and saved the seeds to bake them. I searched for a yummy sounding recipe and this is what I found. It was on this website, along with 8 other yummy sounding recipes Sounds delicious, but when I cooked them you couldn't taste the lemon and sage flavors. So I think next time I'll put more of both of those in. Here's the recipe how I found it:

Brown Butter and Sage Pumpkin Seeds

2 cups pumpkin seeds
3 tbs butter
2 tbs sage
1 tbs lemon juice

Make sure the seeds are nice and dry. I dried mine in the oven for about an hour at 200°, stirring every 15 minutes or so. 

Next the butter. I'd never made "brown" butter before so I looked it up. Its supposed to add more flavor and be tasty. So you put the butter in a skillet and wait for it to melt. Then you wait even longer for it to have a brown tint. The way the recipe describes it is "golden brown and nutty". It certainly smelled very buttery.
(This is not brown enough)
(You can't quite tell, but this is nice and brown)

After the butter is brown, add the sage and the lemon juice and stir real well. 
Then toss the butter mixture with the seeds in a large bowl.


Spread the seeds out evenly on a cookie sheet and bake in the oven for 20-25 minutes at 325°.


****Theses are the changes I would make. I'd probably add 3 tbs of sage and 2 tbs of lemon juice. I would also probably cook them at 300° or even 275°. My seeds came out a little too done, so I would also only cook them for 10-15 minutes at the max. Our oven is a little too ambitious and sometimes heats up way too much. So the original recipe might work great for you. Play around with the temperature and cooking time until you find what works for you.****

Sunday, November 3, 2013

Double Chocolate Zucchini Bread

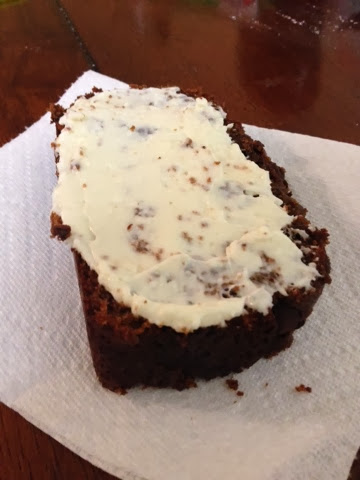
This recipe is oh so delicious! I had a huge zucchini sitting around and wanted to finally use it and this recipe was the winner. The bread was super moist and so chocolatey! Yummy-goodness-delicious :)

Double Chocolate Zucchini Bread
Makes 1 loaf

2 large eggs
1/3 cup honey
1/2 cup vegetable oil
1/2 cup brown sugar
1 tsp vanilla extract
1 tsp salt
1/2 tsp baking soda
1/2 tsp baking powder
1/3 cup cocoa powder
1 2/3 cups flour
2 cups unpeeled, shredded zucchini (if it's really moist press out some of the moisture)
1 1/4 cups chocolate chips (save the 1/4 cup for sprinkling on top)

Preheat the oven to 350°

In a large mixing bowl (I used my bosch) mix together the eggs, honey, oil, sugar, and vanilla. Beat until smooth. Add the salt, baking soda, baking powder, cocoa, and flour and mix well until all the yumminess is combined. Finally stir in the zucchini and 1 cup of the chocolate chips.

Pour the batter into a lightly greased 8 1/2' x 4 1/2' loaf pan, and sprinkle the remaining 1/4 cup of chocolate chips on top of the batter. Bake the bread for 65-70 minutes. Mine only stayed in for 60 minutes though and it was perfectly done, but still moist. If you stick a knife or toothpick in the middle it should come out pretty clean, except for maybe a smear of chocolate from the chocolate chips.

Remove the bread from the oven and let it cool for 10-15 minutes. I know you want to eat it now (it smells heavenly) but just wait. After the 10-15 minutes I took it out of the pan and wrapped it up in foil while it cooled completely, this kept it nice and moist and it was so worth the wait!


McKay and I love, love, love cream cheese so we decided to make a cream cheese frosting/spread to put on our slices of bread. I didn't measure the amounts of ingredients, but here is an approximation:

Cream Cheese frosting/spread

1/2 a block of cream cheese
4 tbs butter
1/4 cup cream or milk
1 tbs powdered sugar

Mix all ingredients together and beat until well combined.

We like our frosting not so sweet, and more cream cheesey. If you like it sweeter just slowly add more powdered sugar to taste. Yumm!

Friday, November 1, 2013

Just a Little About Me

Hello Everybody :)
Just an update on who I am, my name is Brittany Warnick.
I love:
McKay
Animals
Nature
Music
Food
Reading
Swimming
Running
The Beach
I grew up in Arizona and California, currently live in Idaho, and dream of living in southern Utah.
I'm studying Animal Science at Brigham Young University-Idaho.
Its the best major and so much fun!
I come from a big family of 7:
2 parents
1 brother
3 sisters
me
I love them oh so very much!
I am new to the Wonderful Warnick family. They are great in-laws.
I love them very much too!
I married Mr. McKay Warnick just 3 months ago and we are so happy!

McKay has been my best friend for the past 2 years (going on 3 years). 
He makes me laugh like no body else, and he makes me feel like the most important person on earth!
Even when I'm having one of those days when I am just gross he tells me I'm beautiful.
He is so kind and thoughtful.
When we first started dating in 2011 he told me that he had thought about what kind of boyfriend he wanted to be, and how he wanted to handle different situations.
He is always thinking about how to best react to different things before they happen.
And whenever something comes up that causes a bit of contention between us he gets real quiet.
When I ask him whats on his mind he always says something like, "I'm thinking about what I can do to make things go better when......"
He is amazing.
In March we decided that we wanted to be best friends for ever and ever. 
We were so happy with each other and we wanted to feel that way for eternity.
So, he bought a ring and popped the question.
Both McKay and I are members of the Church of Jesus Christ of Latter-day Saints (LDS/Mormon).
For more information on the LDS chruch visit www.mormon.org 
As members of this church we believe that we can be married for all time and eternity.
In order to be married for eternity we participated in a ceremony, called a sealing, in a LDS temple.
It was perfect little ceremony and I couldn't stop smiling as I looked 
at McKay kneeling across the alter from me. 
It was such a big decision for both of us to be sealed together for all eternity.
I am so glad that I can trust McKay with my eternity.